When it came time to get a nursery set up for B, I already had the theme and several items picked out. The beach is my favorite place to be so I’ve always been a sucker for a nautical theme. I called it “Under the Sea” but then everyone thought it was specifically The Little Mermaid themed. While I did want a stuffed Flounder, Sebastian, and both Ariels to be apart of her stuffed animal collection, I didn’t want my theme to be that specific and confining. I started collecting nautical/beachy/ocean items here and there from places like Homegoods, little shops at the beach, and coastal areas I visited. I also had my trusty Nursery Pinterest board where I had paint colors, wall decor ideas, sample nurseries, and cute knick knack set ups saved for future use.
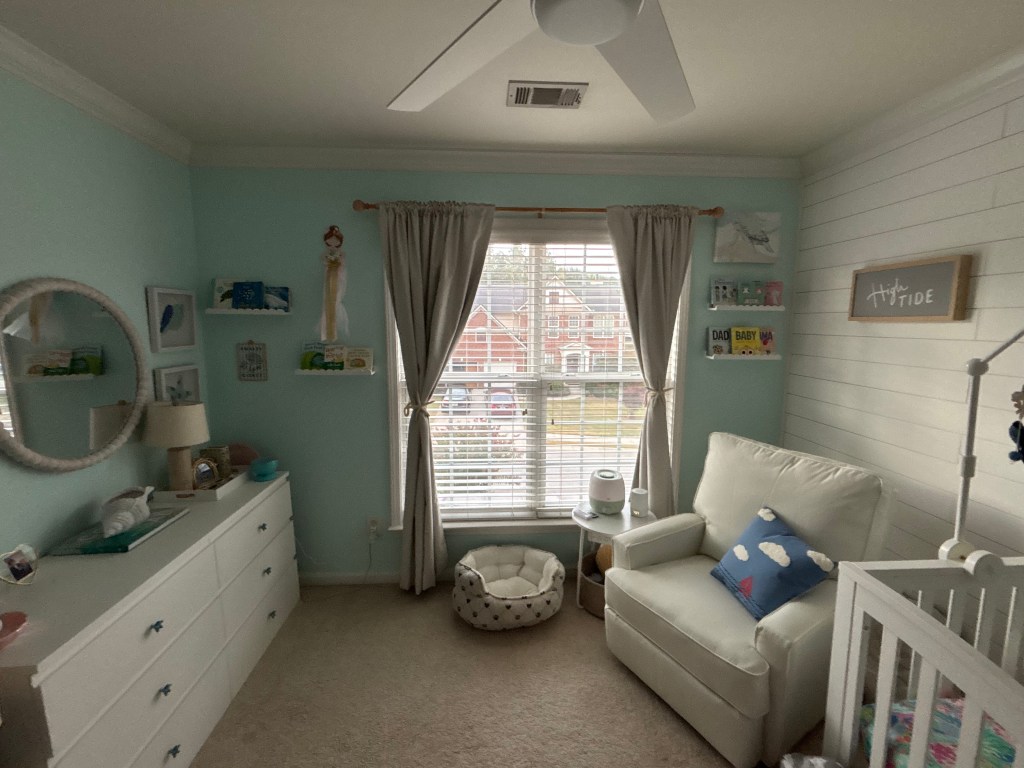
Throughout my pregnancy I slowly started the process of clearing out the room we planned to use and then I began storing baby items in there. I wanted 3 of the walls to be painted a blue/green color with the 4th being a white shiplap accent wall. I chose Benjamin Moore’s Barely Teal as the room color, it was one of the ideas I got from Pinterest. My Husband, Sam, and my parents did most of the work when it came to painting and building the shiplap wall. The shiplap wall was also painted white. I did manage to lay the painters tape, not very well, early one morning when I was 6 months pregnant and couldn’t sleep. Completing the walls took several weekends and endless trips to Lowe’s and Home Depot but once it was complete, it was exactly as I’d pictured it. The final step, before we could start the decorating was the floor. I vacuumed the room several times, spot cleaned the stains on the carpet, then ran the carpet cleaner twice. It was dirty but the final result was great. I recommend getting a carpet cleaner for rugs and carpets, especially when baby starts crawling. We also installed a new light with a fan for temperature control, I know in the summertime the room can get warm.
Once the walls of the room were ready, it was time to start gathering the furniture and figuring out where each piece would go. We had a hand me down crib from our friends so that part was taken care of. The crib was white, which is the color I wanted for the furniture, but I also needed a dresser, a changing table, and a rocking chair. Lucky for me, I live near an Ikea so I chose the cost-friendly changing table and 6 drawer dresser from there. Both were easy (and fun, it’s like adult Legos) to put together. I filmed the entire process, from painting and accent wall building to sitting on the living room floor, binge watching Vanderpump Rules (for the 3rd time ???), building the dresser and changing table. I purchased starfish knobs from Amazon for the dresser and the cabinets in her bathroom. The dresser didn’t come with knobs or a place to screw them in (you can open them from the top but I wanted the added decor) so I had to do the measuring and drill for all 6 of the knobs. The chair I ended up choosing was one I found on Wayfair; it rocked, swiveled, and reclined and I could use my Wayfair gift card for half the purchase. The final little piece was an end table for next to the chair. I did some searching online and chose a small round table with lights right underneath, a basket at the bottom, and a couple outlets and USB ports. This has endup being perfect; it’s where her Nanit sound machine is plugged in and, in the winter, her humidifier. I have extra nautical pillows in the basket below and there is still plenty of space for my water, her milk, and my phone and glasses on the table top.
Placing the furniture in the room was easy once I knew what I had and putting the crib against the accent wall was always the plan. The final step was decorating, hanging photos and art on the walls, organizing the changing table, and setting up the top of the dresser. I got most of my wall decor from Homegoods/TJ Maxx, but I did paint one canvas myself and framed a photo of Sam and I on the beach in Stone Harbor, NJ. A few pieces of art were gifted but I’m almost positive they are all from Hobby Lobby. For her dresser, I chose to add a Gray Malin coffee table book, about the Beach of course, and I added a shell bowl on top. I took the lamp from my office and put it in her room because it fit and I couldn’t find anything I liked better. I also had a tray with no purpose so I included that with some of the knick knacks I collected and were gifted. The most important part of her room, something I had planned from the start, was the photos I wanted to add of the women she was named after. One is in a driftwood type frome and the other in a small cream colored frame with a seashell on the bottom. The Ikea changing table has 2 open shelves for storage. I decided to add light colored baskets to the shelves, to stay on theme and to store her diapering items and extra sheets, then I added a matching laundry hamper for her dirty clothes.
Since B was born, I’ve added more items to the dresser and walls. I had to downsize her stuffed animal hammock because there was too much weight on it. All non-sea creatures were moved to the playroom. Check out the photos below of the process, final product, and what it looks like now. Once the video of the whole process is put together, I’ll share that as well.
The best places to get nursery decor and furniture, in my opinion: Homegoods/TJ Maxx/Marshalls, Target’s Dollar Section, Ikea, Amazon, Wayfair, and of course, hand me downs from friends and family, and items in your own home that could be repurposed.





Leave a Reply